Friday, January 17, 2014

DIY Soap Mold with Corrugated Plastic

I have been busy making handmade soap and I thought I'd share a tutorial of my latest project.  In order to make soap, you have to have a soap mold.  A few dollar store drawer organizers got me started, but I'm a little particular about the appearance and the feel of the soaps shape when using it.  My first soap molds had slanted sides, like a trapazoid.  I prefer rectangular soap.  My options were to buy one or make one, and I do enjoy a little DIY.  After lots of research, I came across a soap mold made with a product called corrugated plastic.  It's what all of those political yard signs are made of, but you can buy it blank to make your own yard sign.  I don't want to make signs.  I want soap molds, and this is how I made them.   ***I have only used these molds to make hot process soap, which is much thicker when putting it into a mold than the cold process method.  I'm sure it can be done, but take care to secure the corners to prevent leakage.***

The local hardware store had a piece of corrugated plastic that was approximately 20 x 24.  It came packaged with a wire stake to use as a yard sign.  No, no signs today.  The only other materials I used were a sturdy ruler (clear acrylic works great) and an xacto knife.


I decided I wanted a mold that was 14" in length on the inside, 3 1/2" in width, and 3" high.  With this size of material I could make two molds, and have a long piece left for other uses.  First I added 3 inches on each side of the 14" of lenght I wanted.  That took me to 20" and so I cut it on the longer side.  This takes a bit of pressure with the xacto knife.  You may have to make one cut first, and then go over it again.  It's pretty sturdy stuff.


This piece was a tad shy of the 20" it said it was, but it worked out fine.  Adding 3 1/2" aross the bottom, plus 3" for each side is 9 1/2".  Since this piece is closer to 19 inches aross, cutting it in  half worked out perfectly.


Next I measured three inches from each edge, and scored JUST ONE SIDE.  It's easy to cut through just one side, but don't get too heavy handed or you'll have to start over with a new piece of material.  Here's where I had the long sides scored and then I creased them.


After scoring the short sides, you will have a scored square in each corner.  You can cut through one side of each square to make flaps.  Which side you cut determines where your flaps will fold over, either the ends or the sides.  You CAN cut the squares completely out, I did for my first mold.  But you might have a little leakage with your soap, so I'm trying the flaps.


Once it's cut, you fold up the sides.  You don't want to permanantly secure them though.  Once you make your soap,  you will pull the sides down to get it out of the mold. 


In order to use the mold you can secure the sides with a heavy duty tape.  If the weight of the soap causes the center to bow, you can use a piece of tape across the center or brace it on either side.


That's it!  Once your soap has set up, slowly unmold each side.  Once the soap is removed, you can scrape the remaining soap off, rinse, and reuse.  Enjoy your soaping!


Tuesday, August 20, 2013

DIY Solid Perfume - Individual, Chemical Free, and Frugal


Making your own solid perfume has many benefits.  As someone whose goal is to eliminate harsh chemicals from my body, one benefit is that it only contains what you put into it.  I like that.  It is also very frugal, but the people who make perfumes or other smelly things aren't going to tell you that.  The most personal reason is that you can create YOUR unique fragrance.  You are not likely to run across anyone else who has created their own perfume anyway, let alone combine the exact same fragrances in the exact same proportions.

First a note on perfumes.  The first rule is that there are no rules, but of course some traditional guidelines.  You can make a single note fragrance, or two, but the most common is three.  When choosing three, a top note is the initial scent, quickly blending into the middle, or heart note, and gradually fading into the base note.  Choose what appeals to you;  floral, citrus, earthy, grassy, or woody from either essential oils or you can make your own from whatever is in your pantry.  Seriously, you can steep spices, flowers, or fruit peels in a carrier oil to make your own.  Again, completely individual and personal.


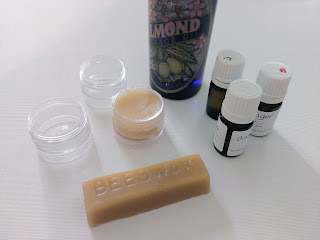
To make your signature scent into a solid, melt beeswax and an equal amount of carrier oil together either in a double boiler or in a glass/ceramic bowl in the microwave.  Don't use plastic unless you want it to smell like your perfume forever.  A toothpick works great to stir.  The carrier oil I use is sweet almond oil, but you can use jojoba, olive, or coconut oil too.  The most common ratio of essential oils is 30% top note, 50% middle, and 20% base note.  When using a tablespoon each of beeswax and oil, try about 7 drops of top note, 12 of middle, and 5 of the base.  But find what works for you.  Working  in small batches helps as well as labeling your creation.  If you get something just right you want to be able to make it again!


You can store these in metal or plastic tins, or something more inventive like a pocket watch or locket.  Alternatively, you can pour it into a lip balm container and apply without touching it.  Brilliant!  If you make your own using these tips please let me know how it worked for you.  Enjoy!


Monday, August 12, 2013

Cheers! Streamer Bow with Spandex Tutorial


Cheerleading season has finally arrived at my house!  This means my 12 year old will finally put her hair up and out of the way, and there is a lot of it.  As I grew up very much a tomboy, the fancy hair accessories were something that took some getting used to.  Then, I started crafting.  Then, I learned to make hair bows.  I have never looked back, I love making these pretties.

This simple streamer hair bow is great for informal events, like cheer practice, or just for fun.  It is made using spandex and grosgrain ribbon.  The cut ends of the spandex do not fray and it comes in many fun patterns.

Materials:
  • Spandex fabric in pattern of your choice.  I got this at Hancock's Fabrics, and only bought 1/8th of a yard.  There will be lots of leftover, so you could make these for gifts at a slumber party.
  • 7/8" grosgrain ribbon in coordinating color.
  • Spray adhesive.
  • Hair elastic, the kind without metal is best.
  • Glue gun.
  • Fabric scissors.
  • Lighter or heat sealer.


First, cut a length of the grosgrain ribbon, about 18 inches, more or less depending on how long you prefer the tails to hang.  Following the instructions on the can, apply spray adhesive to one side of the ribbon.  Press the ribbon, sprayed-side down, onto the wrong side, or back, of the fabric.  


With your fabric scissors, carefully cut the fabric out along the edges of the ribbon.  Cut the ends into a "fishtail" by holding the long ends together at the edge and cutting diagonally toward the center.  I cut both at the same time to make sure the angle is the same, but it can take some practice to get all the ends lined up just so.


Next, pinch your ribbon together at the center.  Using a small amount of hot glue, attach the hair elastic to the under side of the ribbon in the center.  You may have to hold it for a minute until it sets.  Be careful, unless you have asbestos hands!


Finally, take a short piece of ribbon, about two inches long.  Fold it in half long-ways, and use your lighter or heat sealer to seal one end.  Otherwise your ribbon will fray.  Starting with the part that is sealed, glue one end to the underside of your streamer.  Right on the elastic is a good place.  Wrap it around the center, adding glue as necessary, but not so much that it oozes out of the sides.  Once you get to the back, you can see where you need to cut off the extra ribbon.  Cut so that it overlaps a bit, seal the end, and wait a minute to cool down before gluing the end.  


That's it!  Enjoy your new streamer bow, and go out and buy as many patterns you can find in this fun fabric.  The top picture shows one streamer in a patterned ribbon, and the other is made by cutting and applying the spray adhesive to the fabric first, then pressing it onto the ribbon.  It works either way, it just depends on the look you are going for.  If you make a streamer bow using my tutorial, please share a picture or comment on how it turned out.  Cheers!


Sunday, August 4, 2013

Are you a rule follower? Making clothing tags.


When it comes to certain things, I am a rule follower.  I recently decided that after many friends and family have told me, "you should make little girl clothes and sell them online" that I would.  Following much research, as is my modus operandi, I determined it was only appropriate once I created clothing tags so as to follow all applicable laws.  In short, they want to know your name, where the item was made, where the fabric is from, and washing instructions.  Once you have this information, it is relatively easy to create your own.

What you need:

  • word processing document
  • an inkjet printer
  • card stock
  • spray adhesive
  • lightweight fabric, white cotton works great
  • iron-on lightweight interfacing (optional)

Create a document that has all of the necessary information.  Most of what I make uses 100% cotton, and has the same washing requirements.  Therefore, I chose to make one sheet of exactly the same tags.  I made mine pretty darned small, and was able to fit five columns across in one 8 1/2 by 11 sheet. Adjust the font and size to your liking.  I made my company name in our signature font, just to be cute. Why not?  It doesn't take long to find the font you prefer, or choose a new one.

Next prep your fabric.  Cut a rectangle a few inches larger than your card stock.  ***If you want to minimize fraying, cut it out on the bias.  If you don't know what I mean, you probably won't be selling your own handmade clothes!  Following the directions on the can, apply spray adhesive to one side of the card stock.  Lay your fabric on the card stock.  Smooth out any wrinkles by lifting and adjusting.  You do not want ANY wrinkles.  Cut the fabric down to the size of your paper.  Being careful that you know which side your printer will print on, insert paper so that it will print on the fabric.  Allow this to dry for a few minutes.  Gently pull the fabric apart from the card stock.  You can then set the ink with a hot iron, but I would use a press cloth first...just in case.  ***As long as you only use black ink, this should not wash out or run.

Now that you have a sheet of tags, you can iron this onto lightweight interfacing.  It gives the tag a little more body and also makes sure you won't have your tag edges unravelling.  You can cut these out all at once or just as needed.  I use pinking shears to give it a cute edge, and yes, triple redundancy for no fraying.  Sew this onto your garment before assembly, if the stitching will show in a way you don't care for.  I sew mine onto the bodice facing, using a zig zag stitch to reduce any scratchiness.  I do not know any little girls who like scratchy tags.

If you made your own clothing tags please share a picture of your creation!  Enjoy!